CCProxy Account Management
In this section we will talk about the account management of CCProxy. CCProxy features powerful Internet access control function. It helps the administrator to manage clients easily and efficiently. The account management includes "Account List", "Web Filter" and "Time Schedule". We will introduce all of them in detail below.
Account Management Main Interface
Click "Account" button on the CCProxy window to open account manager dialog box:
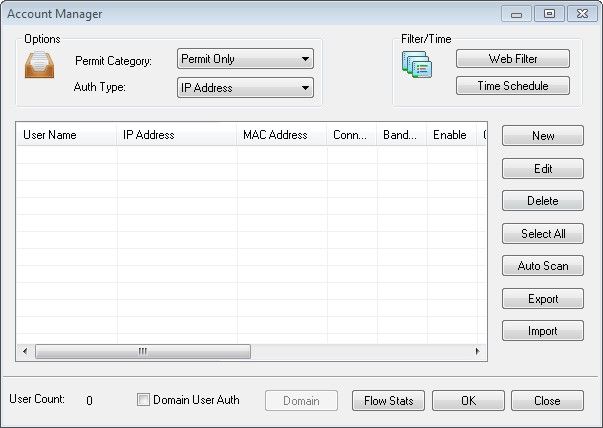
- Permit Category: There are two options - "Permit All" and "Permit Only". "Permit All" means all proxy clients can access the Internet via CC Proxy. "Permit Only" means only the clients which have been given permission can access the Internet via CC Proxy.
- Auth Type: CCProxy account authentication supports IP Address, MAC Address and User/Password. Each account can be authenticated with these auth types. The "User/Password " authentication is only valid to web proxy and socks5 proxy service.
- Web Filter: The administrator can define the filter rule here. CCProxy supports "Web Site Filter"(Permit or forbidden), "Forbidden URL"(Web URL filter) and "Forbidden Content"(Web Content Filter).
- Time Schedule is used to control the clients' on-line time.
- New, Edit, Delete and Select All: These are used to create, edit or delete the account list.
- Auto Scan: This is used to scan the computers on the LAN to get the computer's information automatically. For example, computer name, IP address and MAC address.
- Export and Import: Export is used to save the account list information to a specific folder. Import is used to load account information from a specific file. These two features function just like the backup and restore operations of account list.
- Domain User Auth: If you check this box, CCProxy will sacan out the Active Directory accounts automatically. You can input the AD server name in the edit box. "." means local server.
- Flow Stats: displays the bandwidth usage of each account.
Create New Account
"Account -> Permit Category -> Permit Only -> New".
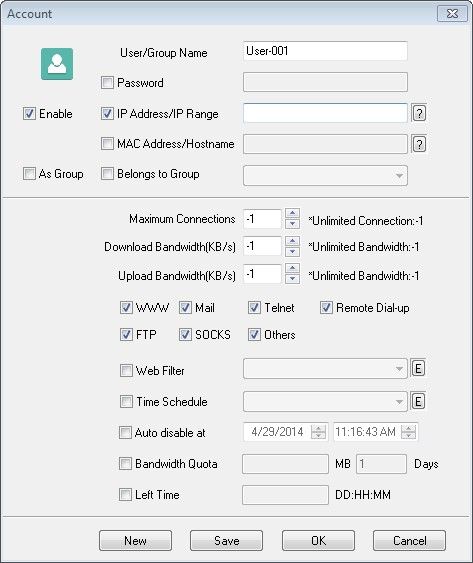
- Enable is used to enable or disable the account.
- User/Group Name is used to define each account. It's also used as the username for User/password authentication.
- Password is used to define the account's password.
- IP Address/IP Range: you can input a single IP or IP range. For example: 192.168.0.1 or 192.168.0.1-192.168.0.10.
- MAC Address is used to define the client's MAC address. Click the "?" to get the MAC address by the IP address or computer name.
- As Group means this account is defined as a group account.
- Belongs to Group: you can add this account to any defined group.
- Maximum Connections refers to the maximum simultaneous connections. The value -1 means no limitation.
- Bandwidth refers to the maximum bandwidth of each connection. The value -1 means no limitation.
- Services are used to choose the permitted services of this account.
- Web Filter: you can choose a defined web filter here.
- Time Schedule: you can choose a defined time schedule here.
- Auto disable at: the account will be disabled at this defined time automatically.
Web Filter
Web filters can effectively restrict clients accessing to particular web sites.
"Account -> Web Filter"

- Web Filter Name is used to define different web filter rules.
- Site Filter: Input the sites you want to filter in the edit box. Site filter supports wildcard character (,?). Multiple sites should be divided by semicolon. For example:
.yahoo.com;???.hotmail.com;www..org.
Also you can define port filter. For example:
:433, .yahoo.com:80;.hotmail.com:;
You can also input a web filter file name here. The web filter file format is one web filter for one line. For example:
.yahoo.com;
.hotmail.com;
.bbc.com:;
.msn.com:433;
- Permitted Sites: the clients can only access the sites which are included in the site filters.
- Forbidden Sites: the clients can not access the sites which are included in the site filters.
- Advanced DNS Filter: Input the OpenDNS address here.
- Forbidden URL: You can define the URL filter here. You can input whole or partial URLs. For example:
http://www.google.com/;.zip;.exe;/mail/;
Forbidden URL is different from Site Filter. Site Filter only applies to the web host name and port, whereas Forbidden URL applies to the whole URL address.
- Forbidden Content can filter web pages with specific characters. If the web page includes such characters, it will be banned. Input the characters you want to name in the edit box. Multiple characters should be divided by semicolon. For example: chat;travel.
Notes: This step is only to define a web filter rule. If you want to apply it to a specific account, you should edit the account's properties and select the web filter rule for the account.
Time Schedule (Control On-line Time, Access Time Control)
Time schedule is used to control the clients' on-line time.
"Account -> Time Schedule"
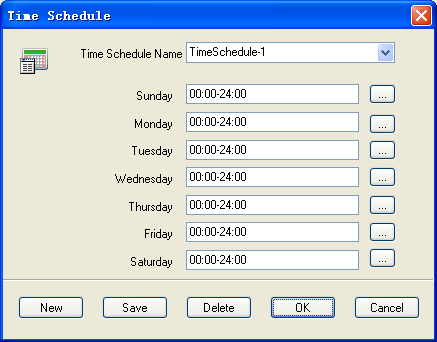
- Time Schedule Name is used to define different time schedule rules.
- Sunday to Saturday: This is used to set different on-line time schedules for business days. You can edit time schedule directly in the edit box or click the button besides edit box. In the popup "Time Table" dialog box, there are 24 time range choices. Note:"01:00" means Internet access is allowed from 00:00 to 01:00. "Apply to," means the time control of the day is only effective for checked choices.
Notes: This step is only to define a time schedule rule. If you want to apply it to the specific account, you should edit the account's property and select the time schedule rule for this account.
Some Samples of Account Management
How to block some certain sites for clients
Suppose you want to block Yahoo and CNN sites.
- Open "Account Manager" dialog box.
- Click "Web Filter" button and open the "Web Filter" dialog box.
- Click "New" button.
- Enter "filter-yahoo" in "Web Filter Name".
- Check "Site Filter" and "Forbidden Sites".
- Enter "yahoo.;cnn." in the edit box of "Site Filter".
- Click "Save" and "OK" button.
- Back to "Account Manager" dialog box. Select one client and click "Edit" button.
- Check "Web Filter" and choose "filter-yahoo" from the list box.
- Click "OK" button. Now the client unable to access Yahoo and CNN.
How to allow only several certain sites for clients
Suppose you want to allow clients only access www.youngzsoft.net.
- Open "Account Manager" dialog box.
- Click "Web Filter" button and open the "Web Filter" dialog box.
- Click "New" button.
- Enter "permit-youngzsoft" in "Web Filter Name".
- Check "Site Filter" and "Permitted Sites".
- Enter "youngzsoft" in the edit box of "Site Filter".
- Click "Save" and "OK" button.
- Back to "Account Manager" dialog box. Select one client and click "Edit" button.
- Check "Web Filter" and choose "permit-youngzsoft" from the list box.
- Click "OK" button. Now the client can only access www.youngzsoft.net.
How to block sites with certain content
Suppose you want to block sites that contains "chat".
- Open "Account Manager" dialog box.
- Click "Web Filter" button and open the "Web Filter" dialog box.
- Click "New" button.
- Enter "filter-chat" in "Web Filter Name".
- Check "Forbidden Content".
- Enter "chat" in the edit box of "Forbidden Content".
- Click "Save" and "OK" button.
- Back to "Account Manager" dialog box. Select one client and click "Edit" button.
- Check "Web Filter" and choose "filter-chat" from the list box.
- Click "OK" button. Now the client cannot access any sites that contains "chat".
- How to block some exercisable files from Internet
- Open "Account Manager" dialog box.
- Click "Web Filter" button and open the "Web Filter" dialog box.
- Click "New" button.
- Enter "filter-exe" in "Web Filter Name".
- Check "Forbidden URL".
- Enter ".exe;.bat;.pif;.msi" in the edit box of "Forbidden URL".
- Click "Save" and "OK" button.
- Back to "Account Manager" dialog box. Select one client and click "Edit" button.
- Check "Web Filter" and choose "filter-exe" from the list box.
- Click "OK" button. Now the client cannot download exercisable files.
How to limit bandwidth for clients
- Open "Account Manager" dialog box.
- Select one client and click "Edit" button.
- Enter "4096" in the "Bandwidth".
- Click "OK" button. Now the client's bandwidth is 4Kb/s.
- If you only want to limit upload bandwidth, please go to CCProxy "Options" -> "Advanced" -> "Networks". You can select the bandwidth control type from "Bandwidth Control Apply for".
How to block some certain ports for clients
Suppose you want to block port 1863 (MSN messenger port).
- Open "Account Manager" dialog box.
- Click "Web Filter" button and open the "Web Filter" dialog box.
- Click "New" button.
- Enter "filter-port-1863" in "Web Filter Name".
- Check "Site Filter" and "Forbidden Sites".
- Enter ":1863" in the edit box of "Site Filter".
- Click "Save" and "OK" button.
- Back to "Account Manager" dialog box. Select one client and click "Edit" button.
- Check "Web Filter" and choose "filter-port-1863" from the list box.
- Click "OK" button. Now the client cannot access port 1863 and MSN messenger.
How to customize the "Forbidden" page
- Open "Options" dialog box.
- Click "Advanced" button.
- Click "Customize" button.
- You can change the "Account auth failed message", "Web site filter message" and "Web content filter message".
- Click "OK" button.
Related: