Send and Receive Gmails by OE with CCProxy
1. Configure the Port Map Rules
1) On the main interface of CCProxy, click the "Options" button(Figure 1-1).
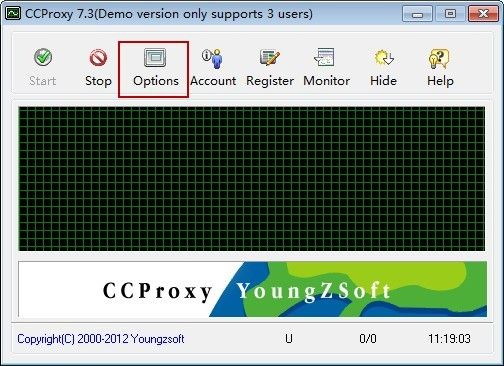
Figure 1‑1
2) In the popup "Configuration" dialogue box, select "Port Map" check box, then click "E" button(Figure 1-2).
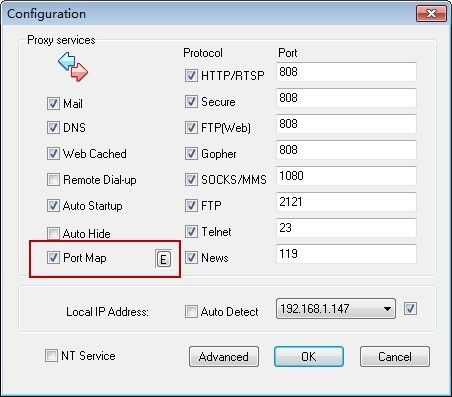
Figure 1‑2
3) The "Port Map" dialogue box will pop up. In "Dest Host" edit box type the pop3 address of gmail, namely, "pop.gmail.com". In "Dest Port" and "Local Port" edit boxes type "995", select "TCP" in "Port Type" combo box, and then click the "Add" button.
In "Dest Host" edit box type the smtp address of gamil, namely, "smtp.gmail.com". In "Dest Port" and "Local Port" edit boxes type "465", select "TCP" in "Port Type" combo box, and then click the "Add" button.
After configured the port map rules, keep clicking the "OK" button to the main interface of CCProxy(Figure 1-3).
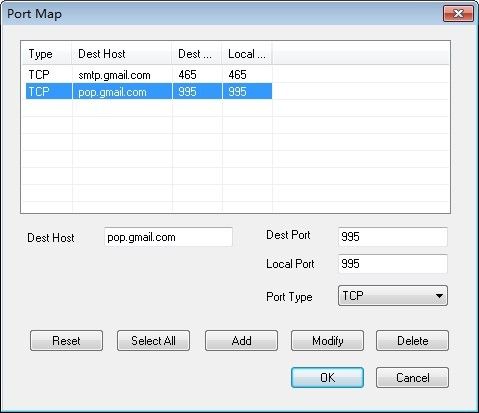
Figure 1‑3
4) The configuration of port mapping has been done.
Note: Before you configure Outlook, please make sure that the "Auth Type" in CCProxy, Accounts windows is set to "IP Address" or "IP/MAC Address". If you have chosen, "User/Password" outlook will fail to connect to email servers.
2. Configure Outlook Express
Assume the IP address of the server is 192.168.1.147, the account name of gmail is "ctian.jane@gmail.com".
1) After launching Outlook Express, click "Tools" on the menu and then click "Accounts" button.
2) In the popup "Internet Accounts" dialogue box, select "Mail" tap, click "Add" and then click "Mail" button(Figure 1-4).
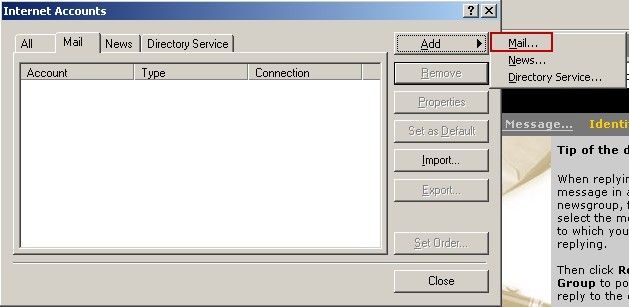
Figure 1‑4
3) In "Your Name" dialogue box, type name(such as yaozhi), then click the "Next" button(Figure 1-5).
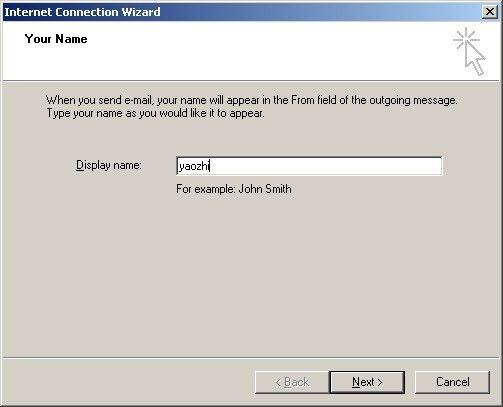
Figure 1‑5
4) In "Internet E-mail Address" dialogue box, type your gmail account name(such as ctian.jane@gmail.com), then click the "Next" button(Figure 1-6).
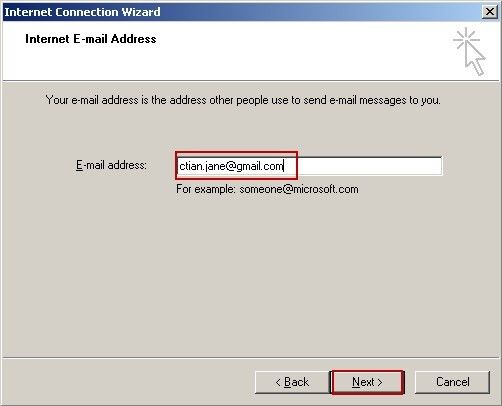
Figure 1‑6
5) In the popup "E-mail Server Names" dialogue box, select "POP3" server, in "Incoming/Outgoing Mail Server" edit boxes type "192.168.1.147" respectively, and then click "Next" button(Figure 1-7).
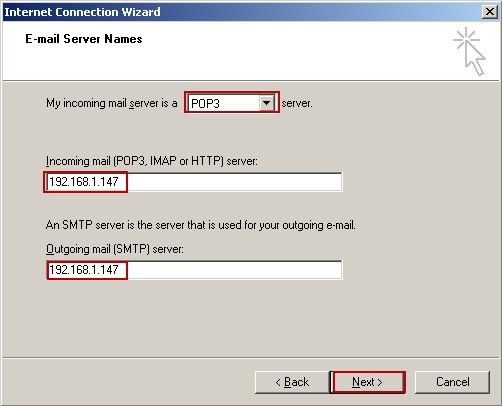
Figure 1‑7
6) In the popup "Internet Mail Logon" dialogue box, input your account name and password. Please note that you should type your complete gmail account name, and then click "Next" button(Figure 1-8).
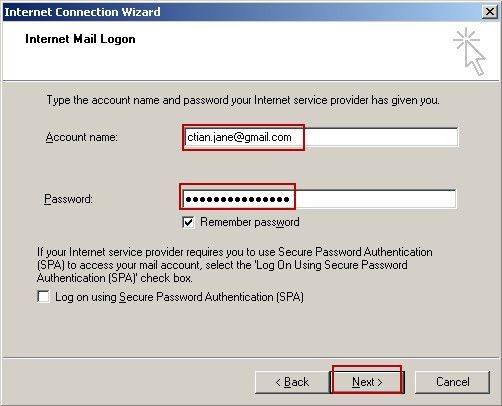
Figure 1‑8
7) Click "Finish" button, go back to "Internet Accounts" dialogue box.
8) In "Internet Accounts" dialogue box, double-click the mail account you created just now(Figure 1-9).

Figure 1‑9
9) Select the "General" tab, in "Mail Account" edit box type your complete gmail address, in "Name" edit box type the name you want to show when sending& receiving e-mails, and in "E-mail address" edit box type your gmail address again(Figure 1-10).
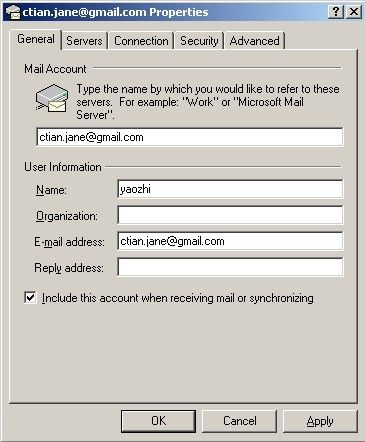
Figure 1‑10
10) Click "Servers" tab, in "Incoming Mail" and "Outgoing Mail" edit boxes type the IP address of the server, namely, 192.168.1.147. In "Account Name" edit box type your gmail account, and type your password in "Password" edit box, select "My server requires authentication" check box, and then click "Settings" button(Figure 1-11).
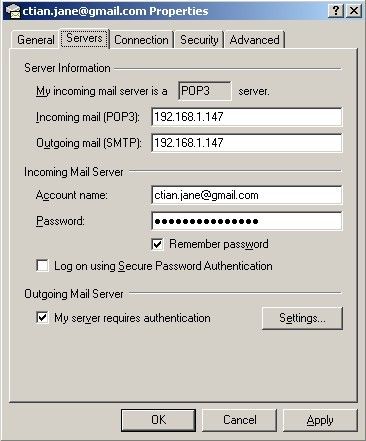
Figure 1‑11
11) In the popup "Outgoing Mail Server" dialogue box, select the "Use same settings as my incoming mail server" radio button, then click "OK" button(Figure 1-12).
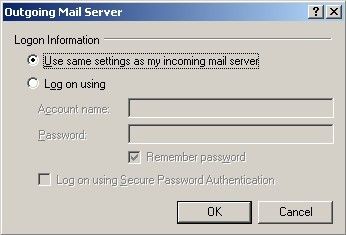
Figure 1-12
12) Click "Advanced" tab, in "Outgoing mail" edit box type "465", select "This server requires a secure connection" check box, in "Incoming mail" edit box type "995", select "This server requires a secure connection" check box, and then click "OK" button(Figure 1-13).
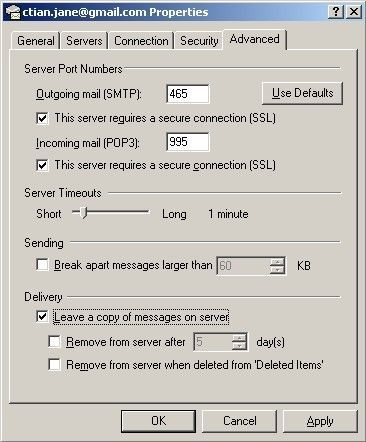
Figure 1‑13
13) Now the configuration of using gmail to send and receive e-mails has been done.
Related: